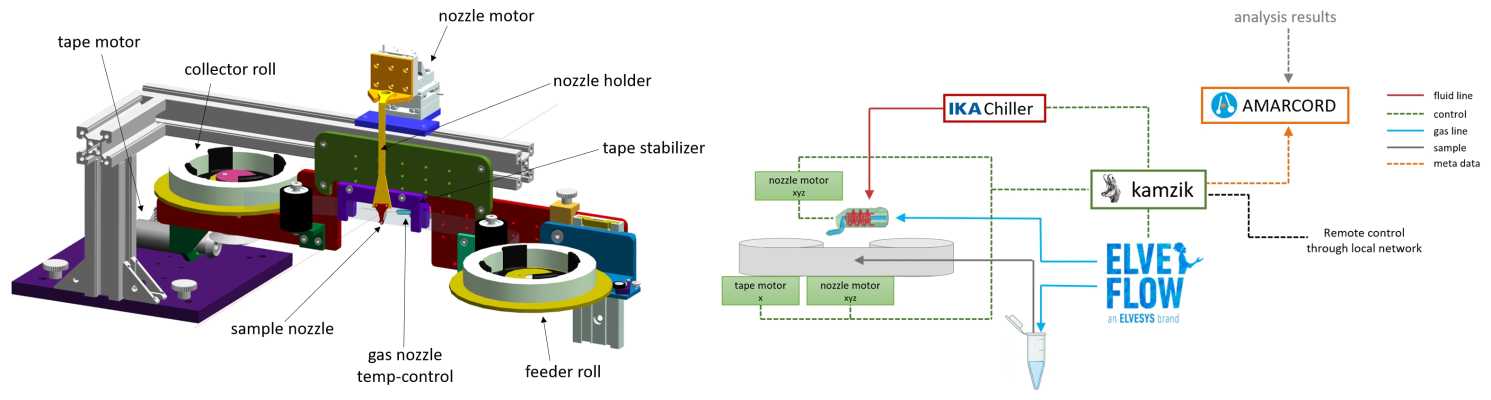
CFEL TapeDrive: Serial Crystallography
- 8.1. Sample characteristics and preparation
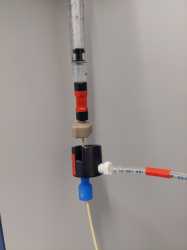
- 8.2. Connecting sample to ElveFlow, sample exchange
- 8.3. TapeDrive operation
- 8.4. Tape roll exchange
- 8.5. Chopper
- 8.6. Data collection
- 8.7. Troubleshooting
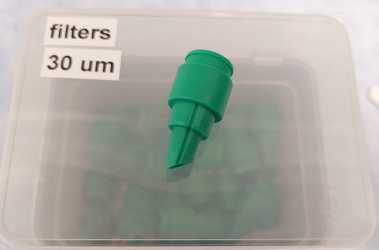
8.1. Sample characteristics and preparation
- Suspension of microcrystals, at least 200 µL with 20% crystal density (more is always better), size range: 2-30 µm, tip: bring some mother liquor for washing, filtering, diluting etc.
Preparation:
- filter through 30 µm (green) or 50 µm (yellow) cell filter into an Eppendorf or Falcon (original!) tube
8.2. Connecting sample to ElveFlow, sample exchange
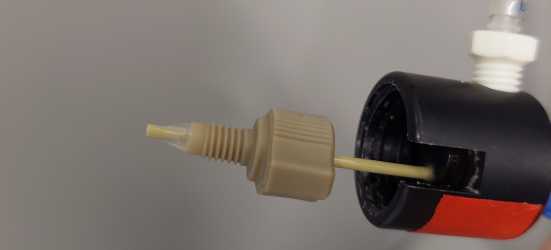
After filtration, screw the ElveFlow connector to your Eppendorf or Falcon tube. Make sure that the yellow-ish tube goes all the way to the bottom of your tube. You can adjust the length by unscrewing the blue fitting on top and pushing/pulling the yellow-ish line. Don't forget to tigthen the blue fitting afterwards!
Be aware to which channel and nozzle line your sample is connected.
Red → Channel 1, crystal line (nozzle capillary without marks/with red marks)
Green → Channel 2, substrate line (nozzle capillary is marked in black)
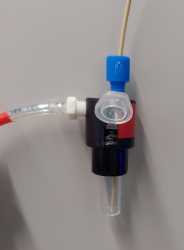
After finishing data collection, flush all lines by connecting an Eppi or syringe filled with ddH2O.
8.3. TapeDrive operation
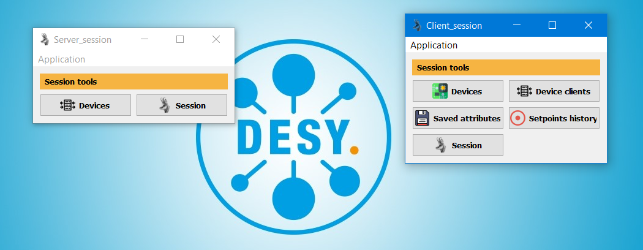
The TapeDrive is controlled through kamzik. To open kamzik, start the server. A terminal will open and shortly after a small window.
Now start the client. Same thing, a terminal will open, shortly after a small window.
Click 'Devices' in the client session to open the control window.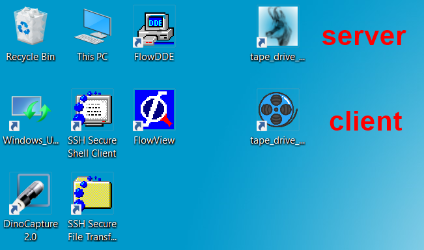
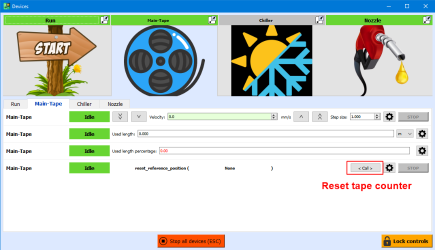
Tape
- Click the 'main tape' icon
- Change the velocity by typing anything from 0.3-3.0 mm/s
- Common velocity is 1.0-1.5 mm/s
- kamzik displays the used tape in m and %. At 98% the tape will automatically stop since the rolls need to be exchanged at this point.
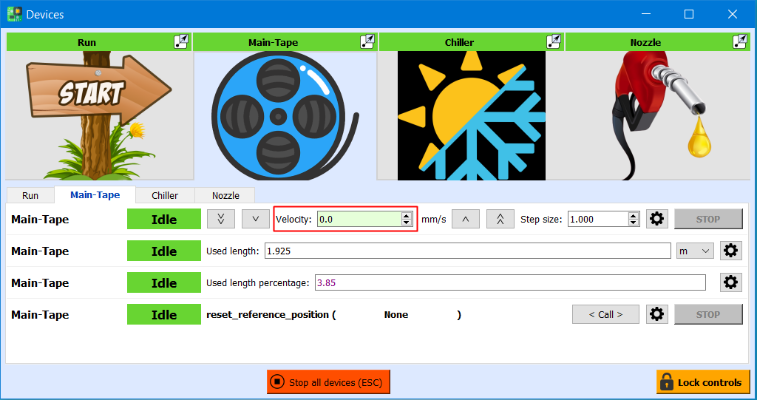
Sample nozzle
- Click on the 'nozzle' icon.
The nozzle position can be adjusted in xyz by clicking on the arrows up and down. (Double arrow = 10 steps). Step size can be varied, 1mm steps are rather big and should be used carefully.
The absolute position is not calibrated and therefore changes after each restart of kamzik.!!! During data collection make sure in which direction you are moving the nozzle, do not move nozzle into beam !!!
Adjust the nozzle position by eye until it nearly touches the tape and roughly meets the X-ray interaction point. Then, move to the control hutch to use the on-axis microscope for fine adjustment. Move the nozzle tip to the beam position (red X) and write down the absolut nozzle position. From there move the nozzle in +x to your desired distance.Different distances combined with the tape speed result in several delay times for time-resolved experiments.direction
recommended step size
for visual adjustmentrecommended step size
during data collection+x
away from X-ray interaction point
1.0 - 0.5 mm
0.1 - 0.2 mm
+y
up
1.0 - 0.5 mm
0.1 - 0.2 mm
+z
towards detector tower, away from tape
0.5 - 0.2 mm
0.1 - 0.2 mm
be careful with -z, tape could be pushed out of focus
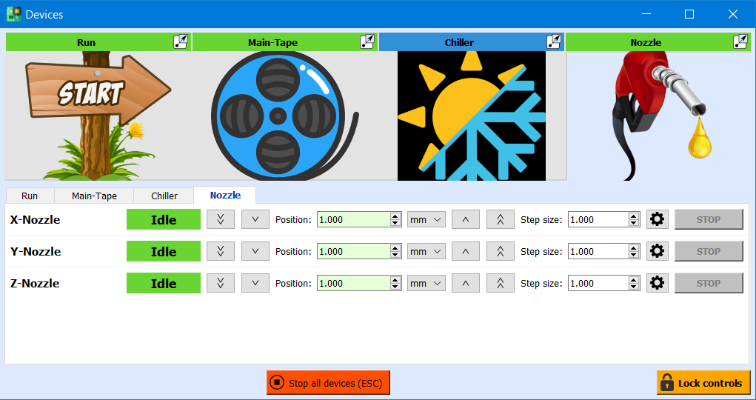
Temperature control/Chiller
- The chiller circulates fluid through the gas nozzle.
Gas nozzle
IR camera
Once the hutch is interlocked, set remote control to the TapeDrive laptop by opening a terminal and executing the following command:
xfreerdp +clipboard /size:1920x1080 /u:Cfelusr /v:cfeld-pcx22611
password: written on control laptop (changes every 6 months)
8.4. Tape roll exchange
The tape stops automatically at 98% used length, if you need to change the rolls for orther reasons, stop the tape (velocity = 0.0 mm/s).
- Remove the (almost) empty feeder roll by pulling it upwards.
- Cut the tape with some cm overlap to glue to the new roll. Do not discard empty roll!
- Get a new tape roll (bottom left on the cart). Polypropylen 15 µm
- Cut the first cm of the new tape roll, directly behind the black sticky part.
- Place new roll on roll holder and use sticky tape to attach the end of the old tape to the beginning of the new roll.
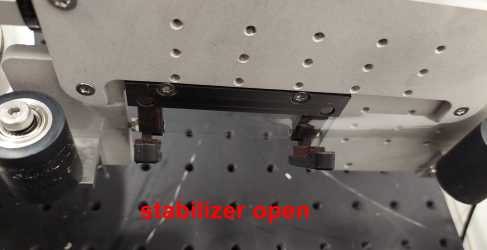
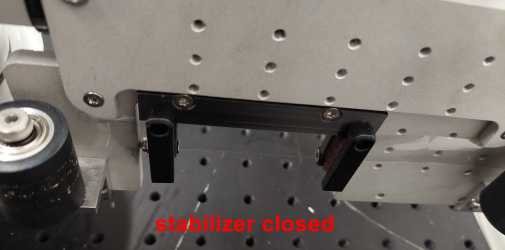
- Open magnetic tape stabilizer on the left side. !!!BEAMSTOP!!!
- Start the tape (3mm/s). Once the connetion side has arrived at the collector roll, stop the tape (0mm/s).
- Again, cut the tape directly behind the connection side. Replace the the old roll with the empty one. Old roll can be discarded.
- Attach new tape to the empty roll by using some sticky tape.
- Close tape stabilizer.
- Reset tape counter in kamzik by clicking "<Call>" in "Main-Tape".
8.5. Chopper
start chopper gui from terminal:
cd /gpfs/local/shared/ChopperControl
python chopperControl.py
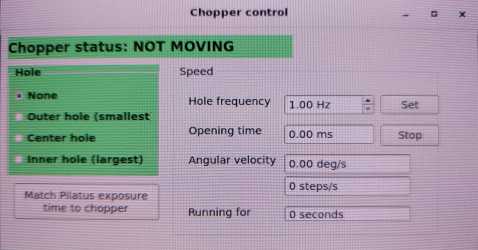
Chopper → no Chopper
- decrease frequency by max. 10 Hz steps
- click arrow down 10x, "Set", arrow down 10x, "Set", ....
- at frequency = 10 Hz, click "Stop"
- set "Hole" to <none> Takes some minutes
no Chopper → Chopper
- set "Hole" to <Inner hole (largest)> Takes some minutes
- increase frequency by max. 10 Hz steps
- click arrow up 10x, "Set", arrow up 10x, "Set", .....
- usually 130 Hz, results in exposure time of 3.7 ms (technical exposure will always be 7.7 ms, since max. frame rate is 130 Hz
8.6. Data collection
Once the hutch is interlocked, set remote control to the TapeDrive laptop by opening a terminal and executing the following command:
xfreerdp +clipboard /size:1920x1080 /u:cfelusr /v:cfeld-tapetop
password: written on control laptop (changes every 6 months)
>>usually the terminal is open, just repeat previous command with arrow up, enter and type in the password
Check list:
always after entering the hutch!
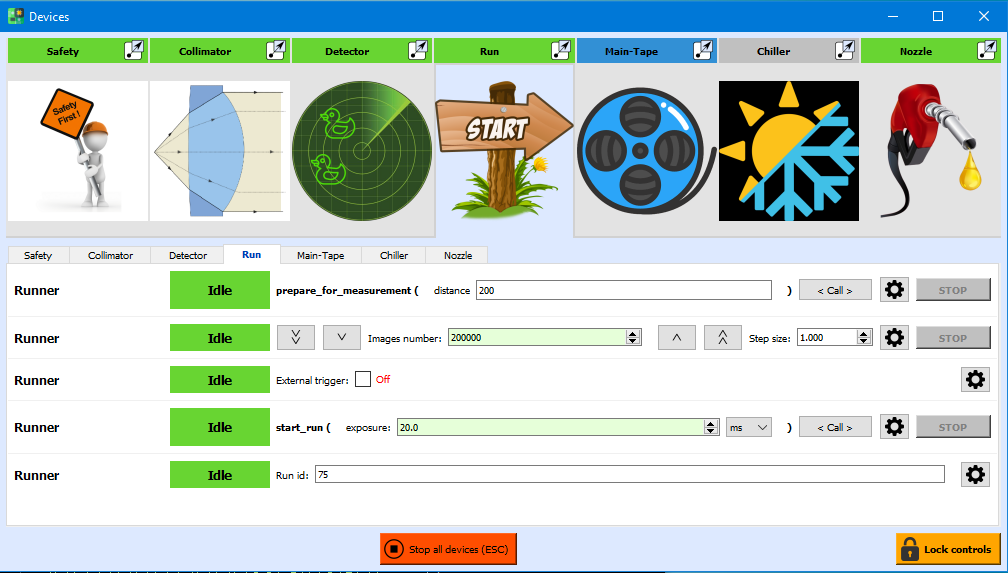
Click "Run" icon in kamzik.
- Put detector distance 200 mm in prepare_for_measurement ( )
- Click "<Call>" next to prepare_for_measurement
This will:- drive the collimator in IN position
- drive detector to 200 mm
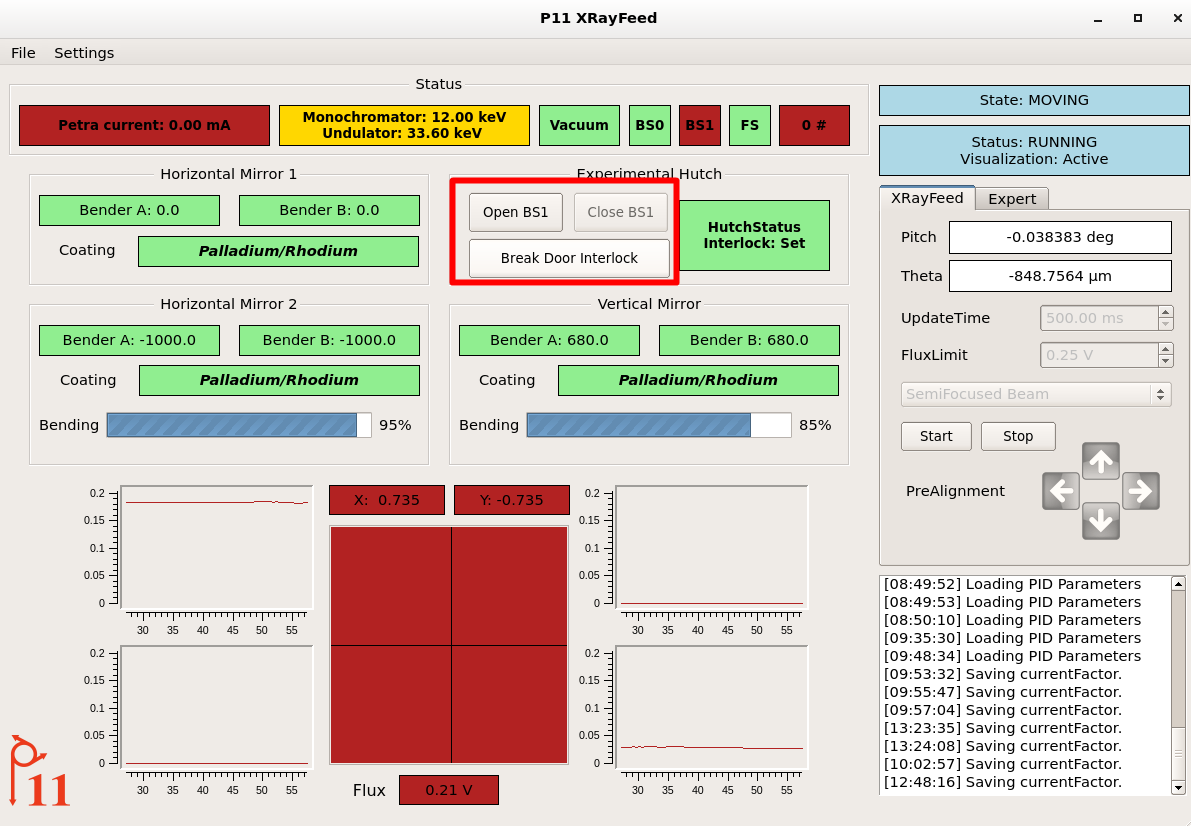
- Open beam shutter BS1 in CrystalControl or P11 XRayFeed
Set run parameters and go 🏃💥
- Set your desired No. of frames
- Enter the protein ID of your crystal sample
- Match exposure time with chopper setting or set desired exposure time
- Check trigger setting and match to chopper setting
no chopper → external triffer off
chopper → external trigger on - To start the run, click "<Call>" next to start_run (exposure )
Parameter | explanation | value |
|---|---|---|
Images number | number of frames you want to collect | usually 100k - 200k, but adjust according to hitrate orientation: 10 % hitrate needs at least 100k images |
exposure | exposure time of Eiger
| with chopper → opening time displayed in chopper GUI |
run id | changes automatically |
|
Detector distance | current detector postion readout |
|
protein ID | protein ID of crystal sample (see AMARCORD) |
|
After data collection/Before entering the exp. hutch:
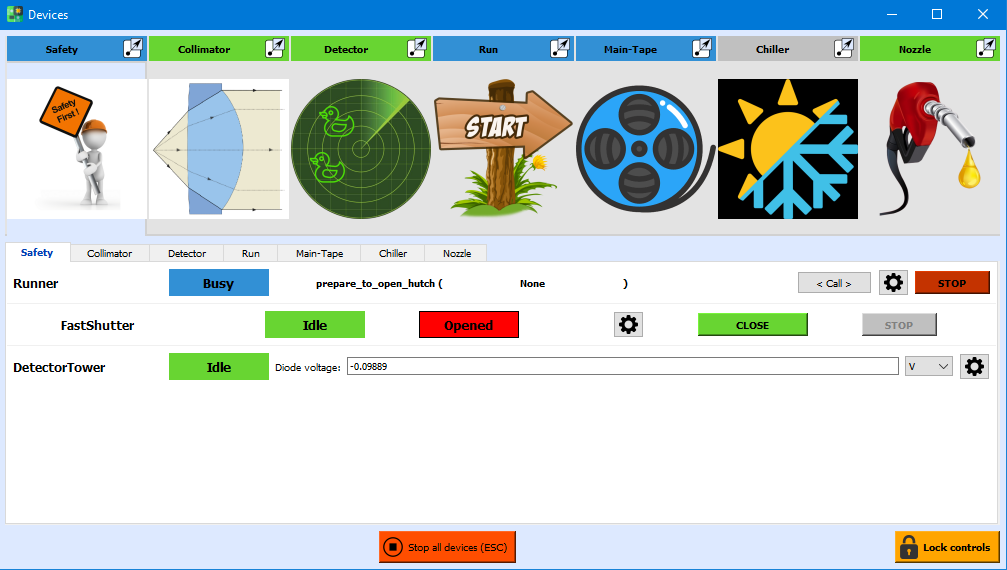
- Go to "Safety" in kamzik.
- Click "<Call>" next to prepare_to_open_hutch. This will automatically:
- Drive the collimator out
- Drive the detector back to 1500 mm
- Close beam shutter BS1 and break door interlock in P11 XRayFeed (monitor top left).
8.7. Troubleshooting
Tape stopped
- Tape roll empty?
- motor connected (icon green)?
Nozzle motors are not responding
- displayed in green=connected?
- nozzle holder colliding somewhere?
- motor limits reached? → position displayed in red
Sample flow is not responding to higher pressure
- channel turned on?
- Sample empty?
- Nozzle or lines clogged? → flush with water, change nozzle
Simplon filewriter/eiger stream issues
- First, restart kamzik (server+client) and see if this solves the issue
- If not, restart the Simplon server (in Astor → haspp11exp03, right click on Simplon/EH.1 and restart)
If nothing works, kill the Simplon process and then start the server again:*
ssh haspp11exp03
ps -ef | grep Simplon
kill -9 simplon_process_id
- After the Simplon server is back up, close all kamzik windows and restart (first server, then client)