Manual for the DOOCS camera server
Contents:
- General Camera info
- Troubble shooting / Restarting the camera server
- Monitoring system
- Camera server general info
- scaling the image / spectra
- Spectra (line outs) and Gaussian fits
- working with ROIs
- saving images "locally"
- Saving images in the DAQ
- Installing new cameras
- Renaming cameras
- special topics
- FAQs
- Troubleshooting
- Cameras used in the FLASH photon diagnostic
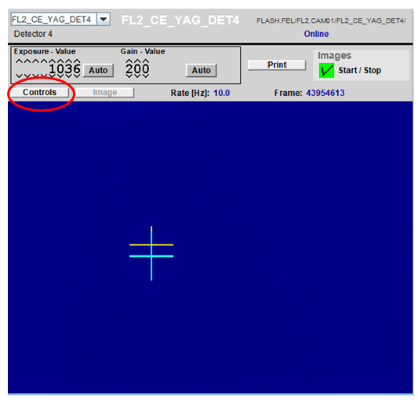
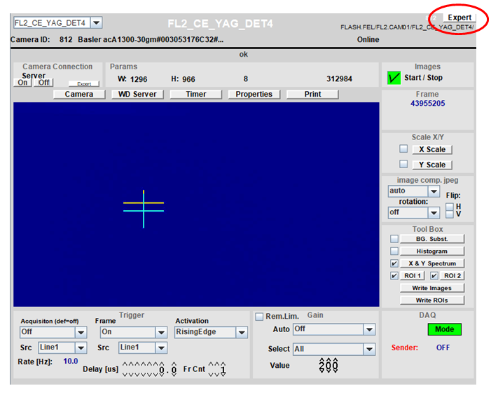
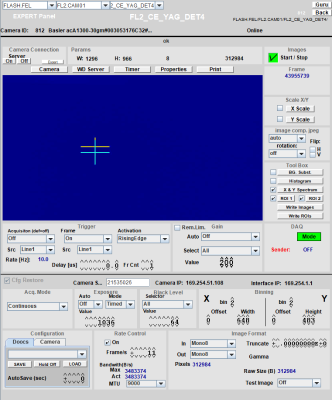
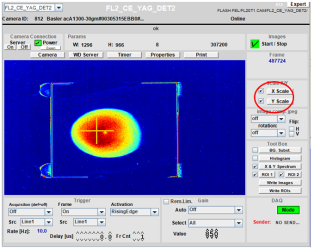
General Camera info
several different camera types can be easily integrated into DOOCS.
The details of the available control parameters depends on the camera type. here is a typical view of
the Standard view: the controls view: and the Expert view with all available control features
Troubble shooting / Restarting the camera server
If there are problems occurring with the camera ( no image is shown, no update, camera server crashes ...) then it is mainly 2 reasons:
- There is no trigger connected to the camera → check with trying to run the camera untriggered ...
- the server has problems -> restart the server.
Even if it seems unrelated ( camera saved only 0 in the DAQ, reprate can not be changed... ) it turned out that restarting the camera server is helpful.
- Best to make a screenshot (in expert mode) to the logbook before restarting in case parameter settings are lost ...
- goto WDserver and press restart. The camera panel will go red and will come back after about 20 seconds ...

If the restart (several times ...) does not help there is an option to make a "deeper restart". This option uses a restart script which includes power cycling of the camera ( for ethernet cameras)and reloading a standard configuration. One has to be logged in at a linux computer in order to run the script.
Monitoring system
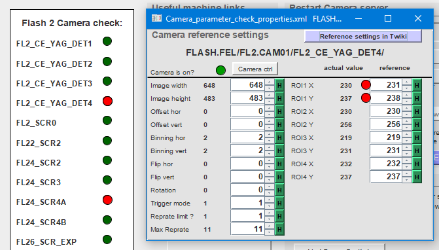
we implemented a monitoring system for the important beamline cameras in FLASH1 and FLASH2.
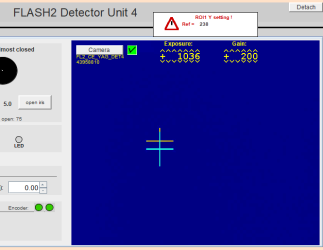
The camera check overview shows a red indicator if the camera is off OR the actual values are different from the saved reference values. Clicking on the red symbol in the camera check one can get to the overview of the parameters. Here a red dot indicates which parameter is different from the reference setting. e.g. if ROI settings have been changed also the reference settings have to be changed accordingly if they are now the new reference !!
The warning is also shown in the according control panels for the cameras.
Camera server general info
For the CeYAG camera in the FL1 tunnel Gerhard implemented a feature that during a restart a camera_server.conf.default file is copied as conf file to always have the same settings. if one wants to change something permanently one has to edit the default file. e.g. cp /export/doocs/server/camera_server/camera_server.conf.default /export/doocs/server/camera_server/camera_server.conf
scaling the image / spectra
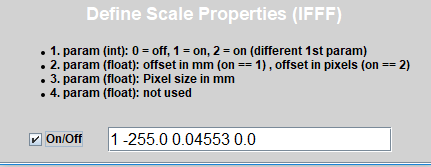
one can scale the image with a different scale as pixel. the center as well as the "pixel size" can be set.
Spectra (line outs) and Gaussian fits
The camera server can fit the vertical and horizontal averaged data with a Gaussian fit and provides the corresponding parameters ( height, centroid and width) which have a history and can be used as for optimizing a signal ...
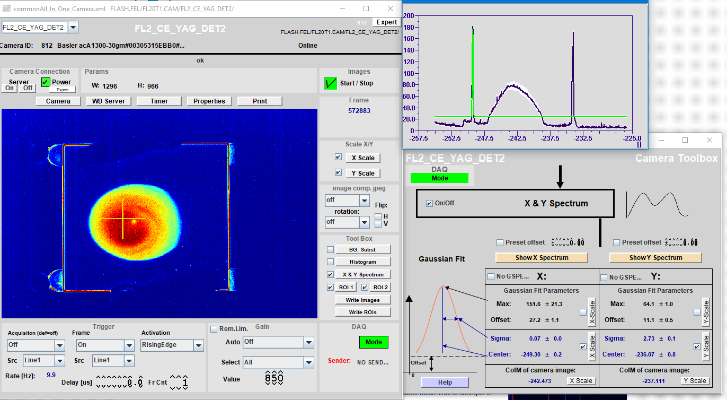
"Spectrum" of the whole image. this can lead to a wrong fitting ...

For a useful fit it is better to look at the "spectrum" of a ROI which can be set to the desired region. Note that the ROI has to be filled (Width = 0) to be correctly averaged!
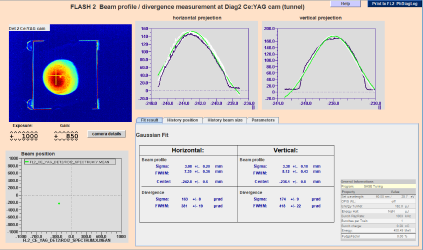
For some cameras we also have dedicated Beam profile viewers.
working with ROIs
To create more ROIs one has to do the following:
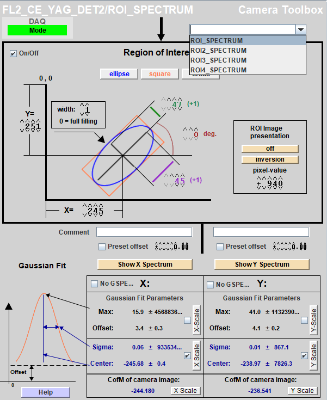
- Define in ENVIRONMENT file the environment variable "export FLASH_CAM_ROI_NUM_ENV=xxx" . With xxx the maximum number of ROIS one needs in a camera controlled by the camera server. (The ENVIRONMENT file is under e.g. export/doocs/hasvuvblfw2/server/camera_server). after editing the ENVIRONMENT file one has to restart the camera server.
- NOTE the file os owned by doocs adm. to edit it one can use WinSCP and log in as doocsadm.
- now all cameras have maximum ROIs. if you need less for some cameras read below:
- Set the required number of ROIs for every camera in the property ROIS.NUM in the configuration file. The way how it's done is the following. On the camera server re-start xxx number of ROIS will be created for every camera. But after reading the configuration file the non-required ROIS will removed for every camera separately according to ROIS.NUM.
saving images "locally"
The tool writes images of either bmp or an image depemdent format to the specified folder. The folder is on the computer on which the camera server is running ![]() and the path starts from the camera server path
and the path starts from the camera server path ![]() options
options
The typical location of the camera server is /export/doocs/server/camera_server/. . if you put "./" in the field Camera Directory. the images in the camera_server directory. It is better to have a separate directory as subfolder like "CameraImages". on some computers this is already installed.
Another aproach is to write the files to a home directory. One may put e.g. "/home/vuvfuser/CameraImages/" in the Camera Directory to save on the home directory.
- aquire single images: just press "writing once"
- aquire a defined number of images: put the number of images in the "count" field and press enter.
- aquire many images. pressing the continuously writing button starts the writing and stops when you press the stop button or the hard drive is 95% full
note that youor login has to have the permissions to write in the specified field!
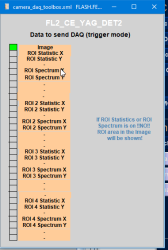
Saving images in the DAQ
To save the cameras in the DAQ the server has to have a sender and they have to be "registered" in the DAQ. if this is one one can activate the saving by activating "images"
if the timing of the sender is not configured correctly it often occurs that the images are saved by one bunch ID "too late" (-1 has to be substracted by the bunch ID of the camera). one can finetune the sending by optimizing the USR1 time.
Depending on the binning, bit depth, image size the correct USR1 setting may be different. but typically 40-80 is a good number
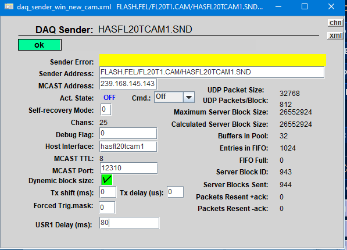
one can check the mismatch easily by comparing the GMD and the integrated counts on the camera. here an example for USR1 time = 0. (for USR1 >= 20 the correlation is present without bunch ID shift )

Here a report where the image saving in the DAQ is investigated in more detail:
and a more recent "studies"
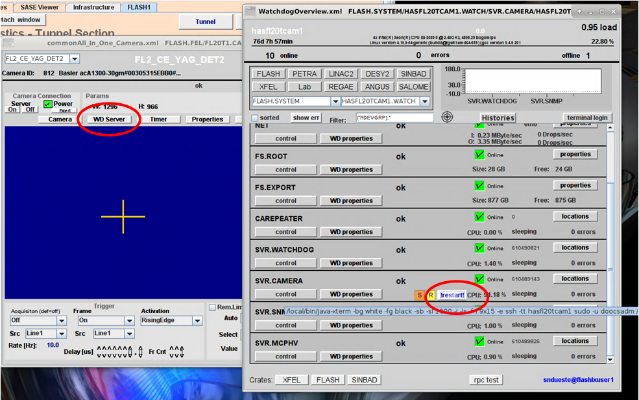
Installing new cameras
To install an additional camera to a DOOCS camera server perform the following steps:
- Open the Jddd watchdog panel for the server (WatchdogOverview.xml). goto camera server -> locations
- right upper part is a button Device control
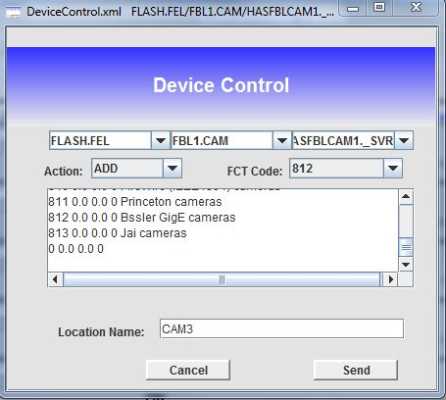
-
- use action: add
- chose FCT code (812 in our case)
- add name
- press send
the you see the new camera in the location table. do not forget to click "Cfg. restore" in the camera expert panel once everything looks o.k. with the camera ( otherwise the cameras may switch with their names ...)
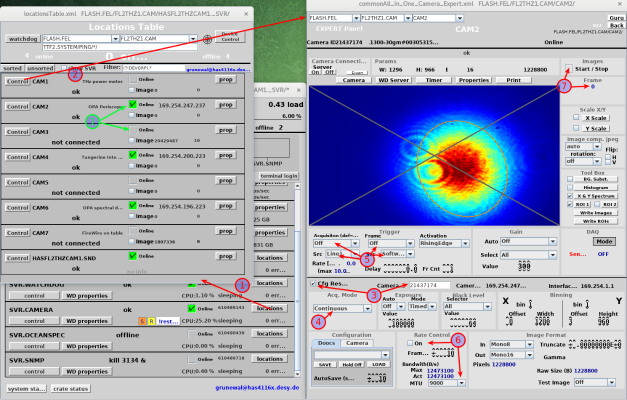
- First you'll have to open the camera location overview from the watchdog panel
- Enable the camera you wanna edit. If the check mark can't be enabled, you can't talk to the camera.
- Open the Camera Control Panel and switch to the "Expert View"
- Make sure the "Cfg Restore" checkbox is set. This will make the camera server associate the camera-id with this server location. So after a reboot/restart this location controls the same camera.
- Switch to continuous acquisition
- Setup the trigger as needed
- Enable rate-limiting in case you don't have a trigger
- Start acquisition; if the frame number increases, you did everything right
Renaming cameras
While the camera is running one can go to the WD -> locations -> properties ... and then change the NAME to the desired one (NO SPACE CARACTERS IN THE NAME !!!) and press enter ... thats it
special topics
Background subtraction:
- it is important that the values for negative offset are 0. otherwise the subtraction does not work (experimental finding by Stefan ...) . For the Basler A311 cameras the mode has to be 5 . for mode 7 the Background subtraction does not work... (no resources left)
- For Basler ethernet camera's the offset needs to be zero in any case, otherwise the server will crash. Also note, you have to make a reference image, that you have to stop/start the image acquisition before you can enable the background-subtraction in jddd.
Power Over Ethernet
Triggering
- it is important for the ace cameras that the trigger is 7 µs long. when it was accidentally switched to 0.7 µs the a311 were still triggering while the ace were NOT !!
- BLCamTrigOverview
Restarting Servers
- Starting with DOOCS release 18.10.6 the watchdog-server provides a new feature called PRE_START. This lets the watchdog-server check if the actual server directory contains a PRE_START script. If this script is present, it will be executed before the actual server start command.
- Restarting the server through the watchdog will make a call to the doocs script:.
doocs [re]start camera_server no_pre_start
- Calling doocs start camera_server will include the
PRE_START script, which is by default set to /export/doocs/server/script/reload_CAMERA_Server .
- You can also use the !restart!button from watchdog server overview. This will execute /export/doocs/server/script/reload_CAMERA_server directly.
- The reload_CAMERA_server script will usually:
- Stop capturing on all cameras (optional)
- Stop the camera_server
- Unload the device drivers (optional)
- Restore a default configuration (optional)
- Start the camera_server
FAQs
- How can I save some images? you can save images of the camera locally on the computer you are running jddd by clicking the right mouse button and use "save as png..."
- How can I save many images? goto camera "control" -> "Write images" - a new window opens. With this you can save images (set best to BMP) with timestamp to the computer on which the camera server is running !! (hasftunnelcam1). here the directory in which it safes is : hasftunnelcam1: /export/doocs/server/camera_server/images (if you have the standard setting "./images/" in the directory field). you can get the images with e.g. WinSCP. See also help in the "write images" window for more info.
- No images are shown / no update - what to do? Check if the camera is on (right upper part: Images. the checkbox should be green). If not activate the check box. if this is on but the frames are not counting the trigger might be off. you can check this going to
- The cameraserver is unavailable - what to do? See Restarting Server
Troubleshooting
Individual camera manuals
Cameras used in the FLASH photon diagnostic
- Link to PCO status Sept 2015