Gotthard related stuff
page content:
Info collection related to the Detector
- : READ_ME_GOTTHARD_detector.pdf (Server information is outdated, see below)
- some investigation related to read out noise for different exposure times
Ethernet and trigger connections:
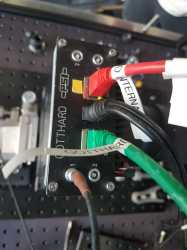
- trigger at port 1
- gbit port <---> Server PC (hasfl2det01 at FLASH2, no server currently at FLASH1)
- base-T <---> Office net
How to use the Detector and save in DAQ
for now very short: run the Exp2 DAQ with EXPERIMENT_GOTTHARD included as shown below. AND press the start button in the Gotthard DAQ (you get there from the Gotthard panel lower left button "Gotthard DAQ"
- Main Gotthard panel for users :
- Exp2 DAQ RC gui for recording Gotthard data. EXPERIMENT_GOTTHARD has to be included
Operation hints (June 2023):
- Where is the GOTTHARD GUI: FLASH2 - Panel: Infrastructure tab → Miscellaneous tab → FLASH2 GOTTHARD ctrl button
- Never change a running system: Do not change parameters while the Detector is running/taking data, The detector will crash.
- Furthermore the module will crash if recieving to much light (e.g. illuminating with flash light during data dating.
- Checking/switching server: The server is reachable from the GOTTHARD GUI (lower left corner find the status of the server PC "hasfl2det01") click it to open server/watchdog control. The server is otherwise found under FLASH.SYSTEM → HASFL2DET01.WATCH. Open control of SVR.GOTTHARD (for start/stop/reboot)
- Robooting the GOTTHARD (if it has crashed):
- soft reboot: 1. open console on linux DESY PC, 2. type "telnet (Hostname/IP)" e.g. "telnet cfeld-gotthard02" , 3. you are logged on the GOTTHARD module as /root, type "reboot", 4. wait until server/GUI has reconnected to the module
- hard reset: power down the GOTTHARD, wait some seconds, Repower the module, wait for reconnection to server/GUI
- In case of a crashes (no data taking, no reaction on input: Reboot the detector) or if GUI input returns error: Check connection (Power/Data), check GOTTHARD server
- Permantent operation: Activate check box for continous run to trigger automated restart of the module after reaching the set number of short or after sefl-stopping due to hickups. The restart needs about 1-2 seconds. During this time no data is taken.
- Background: Check "Take" stores the actual detector image: Uncheck this again. Than this stored image is online subtracted from all images in the GUI when checking "subtract". The DAQ only stores raw data (NOT the background subtracted images)
Using burst mode (standard operation as of June 2023)
- Do not change the delay in the GOTTHARD GUI. The Alignment to the FEL pulses are done by adjusting the FLASH trigger: FL2EXP1/RTM.TRG6, it can be opened from the GOTTHARD GUI or from FLASH2 → Beamlines → FL26 → Exp. control → Patch Panel26-2 → MTCA Trigger 2
- Exposure range is 200ns < Exposure < ~1/3 * Frame periode
- The periode is: 9968ns for 100kHz, 4984 for 200kHz, 1993 for 500kHz
- The number of frames must be lower than 125, for stable operation 120
- Number of Shots: Number of trigger events before self stopping, select large number for permanent operation
Modules and their exchange
Two (Three) modules available (physically at FLASH):
hostname | Status | Sensor | Sensor image | config file | DOOCS address (status 2023) |
|---|---|---|---|---|---|
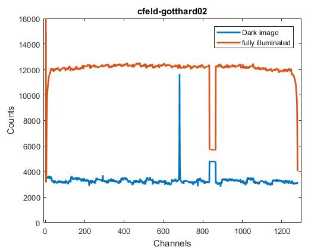
cfeld-gotthard02 | standard/online/working | two small areas of damaged pixels |
| bchip_mpc1922Receiver.config_cfeld-gotthard02 | FLASH.FEL/GOTTHARD/FL2/ |
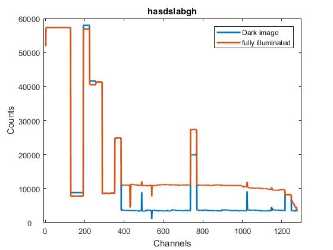
hasdslabgh "gotthard dgt01" | working | first 1/3 is blind, strong base line offset in the center and a further blind bunch and the end |
| bchip_mpc1922Receiver.config | FLASH.FEL/GOTTHARD2/FL2/ |
cfeld-gotthard01 | was working (2018), backilluminated! the sensor front is Al-shielded for x-rays | ? | bchip_mpc1922Receiver_petra.config |
To change a module the respective config file has to be selected. However changing it will crash the server, thus, it is not possible to change on the fly. Connact Sören if there is the need to exchange a module. However, the differences in the configs are only the hostname. (To be tested: On the fly might work, if one edits the config-file itself after switching of the server instead of selecting another config file in the GUI. But how to transport this information to the GUI? → Display the first line of the config file!) The config files are located at the hasfl2det01: /export/doocs/server/gotthard_server/cfgs/
GOTTHARD Server
The server for GOTTHARD (FLASH2) runs on hasfl2det01. Its watchdog and control (svr.GOTTHARD) can be found under FLASH.SYSTEMS - HASFL2DET01.
Main Parameters and limits
Parameter | Design | Real /tested |
|---|---|---|
Max Frames | 125 | 120 |
Max. exposition time | ~2/3 of period time | |
Min. period time | ca. 930 ns | |
Max repetition frequ. | 1 MHz | 833 kHz (software limited) |
Soft reset a GOTTHARD Module
- Open console on Linux PC (connected to DESY net)
- write "telnet cfeld-gotthard02" (or the respective Host name or IP of the module)
- you should be connected to the GOTTHARD onboard system → </root:
- type: "reboot"
- the module reboots (wait ~1-2 min), the telnat connection will be cut due to reboot.
Triggering the Gotthard with a burst trigger
it is also possible to trigger the Gotthard not only with 10 Hz but with a burst trigger
here are some Info from PIS (June 2023)
I think one does not need to set it in GUI when running in continuous mode. In G1, whether the detector is running in burst or continuous mode depends on the setting of the "number of frames" in trigger mode. If the number of frames sets to 1, it will be in continuous mode (1 trigger -> 1 frame).
Since G1 accepts triggers from the lemo connector, one can also use the bunch train trigger. The spacing of the trigger train needs to be larger than 3.2 ms, which is the readout time of G1.
Regarding the detector setting (assuming it is 200 kHz pulse rate, 100 pulses per train):
- timing mode: trigger
- number of frames: 1
- number of triggers: M x N (M is the number of trains and N is the pulses per train, one can also take a bit more frames per train to track the pedestal/dark)
- period: < 5 us (1/200 kHz = 5 us, the period needs to be slightly smaller than 5 us since the detection of the trigger only starts after the period is reached)
- exposure time: > 93 ns and smaller than period
Alignment: One of the four lemo connectors on G1 outputs its exposure window. Using an oscilloscope, one can use a photodiode under the beam and align the pulses from the diode and the exposure window of G1 by fine tuning the exposure time of G1 and/or the setting of "delay after trigger" from the detector, or "delay time" of the wave-generator (if a wave-generator is used to generate the triggers for every pulse). After this, one can do a fine scan of trigger delay to find an optimal setting with highest signal after putting G1 under the beam.
by:
Dr. Jiaguo Zhang
Paul Scherrer Institut
Forschungsstrasse 111
5232 Villigen PSI
Switzerland
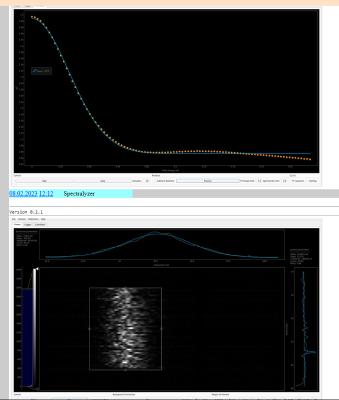
Using the Spectralyzer together with Gotthard
one needs spectralyzer 0.2.4 or newer
start spectralyzer on one of our consoles ( works for fl24 and fl26user ) (for installing new version or for other users .. ask Christopher Behrens... )
fl26user@hasfcons1:~$ mamba activate spectralyzer
(spectralyzer) fl26user@hasfcons1:~$ spectralyzer